This article demonstrates how to create a simple scheduled task using the WSO2 ESB.
This is an example that you can complete withing 5 minutes and will give you a basic understanding of how easy it is to deploy a scheduled task using the WSO2 ESB.
Steps:
1. Create Task class
2. Export task class as a jar
3. Add to WSO2 ESB classpath
4. Create Scheduled task
Step 1:
First of all you need to create a Task Class. For this example we will create a simple class that prints out "HELLO" and a timestamp.
First download the synapse-core-1.2.jar from either the Synapse site or from the Maven Repository
Create a Java Project in eclipse (or any IDE you preffer) and create the following class:
package wso2.demo.taskt;
import java.io.BufferedWriter;
import java.io.File;
import java.io.FileWriter;
import java.io.IOException;
import java.util.Date;
import org.apache.synapse.ManagedLifecycle;
import org.apache.synapse.core.SynapseEnvironment;
import org.apache.synapse.startup.Task;
public class SayHello implements Task, ManagedLifecycle {
private SynapseEnvironment synapseEnvironment;
@Override
public void destroy() {
// TODO Auto-generated method stub
}
@Override
public void init(SynapseEnvironment arg0) {
this.synapseEnvironment = synapseEnvironment;
}
@Override
public void execute() {
try {
File file = new File("E:\\sayhello.txt");
// if file doesnt exists, then create it
if (!file.exists()) {
file.createNewFile();
}
FileWriter fw = new FileWriter(file.getAbsoluteFile(), true);
BufferedWriter bw = new BufferedWriter(fw);
bw.write("---------------- HELLO ----------------- "+ (new Date()).toString() + "\n");
bw.close();
} catch (IOException e) {
e.printStackTrace();
}
}
}
Step 2:
Export the above class as a Jar file. Say with the name SayHello.jar
Step 3:
Add the above class to the ESB Class path by placing it in the <ESB_HOME>/repository/components/lib directory.
Step 4:
Now you can create the Scheduled task in your ESB.
1. Login to the ESB
2. Select "Scheduled Tasks" under the "Main" tab

3. Add a new task
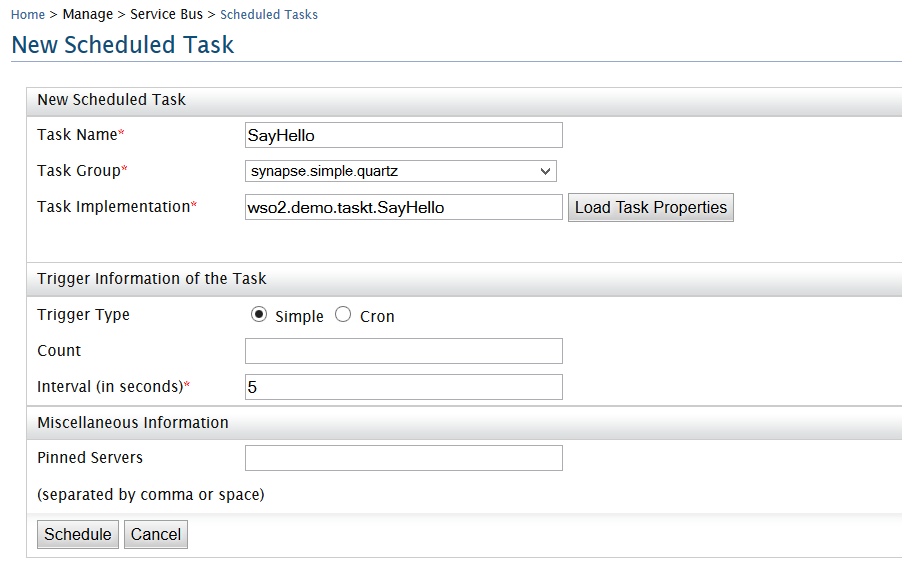
Replace the Task Implementation field with the qualified name of the class you created.
In the next section the Trigger type would be what type of scheduled task you want it to be. By simply defining the count and interval, or by providing a cron expression. Lets select "simple" for this example.
Count - defines how many times your job needs to run
Interval - specifies time gap between task executions
Click Schedule to save the task.
Aaaand That's it ...
Your output file would show the following:
---------------- HELLO ----------------- Mon Jun 09 20:11:37 IST 2014
---------------- HELLO ----------------- Mon Jun 09 20:11:42 IST 2014
---------------- HELLO ----------------- Mon Jun 09 20:12:46 IST 2014
---------------- HELLO ----------------- Mon Jun 09 20:12:51 IST 2014
---------------- HELLO ----------------- Mon Jun 09 20:12:56 IST 2014
---------------- HELLO ----------------- Mon Jun 09 20:13:01 IST 2014
For more options in creating scheduled tasks visit the following page:
Adding and Scheduling tasks in WSO2 ESB
This is an example that you can complete withing 5 minutes and will give you a basic understanding of how easy it is to deploy a scheduled task using the WSO2 ESB.
Steps:
1. Create Task class
2. Export task class as a jar
3. Add to WSO2 ESB classpath
4. Create Scheduled task
Step 1:
First of all you need to create a Task Class. For this example we will create a simple class that prints out "HELLO" and a timestamp.
First download the synapse-core-1.2.jar from either the Synapse site or from the Maven Repository
Create a Java Project in eclipse (or any IDE you preffer) and create the following class:
package wso2.demo.taskt;
import java.io.BufferedWriter;
import java.io.File;
import java.io.FileWriter;
import java.io.IOException;
import java.util.Date;
import org.apache.synapse.ManagedLifecycle;
import org.apache.synapse.core.SynapseEnvironment;
import org.apache.synapse.startup.Task;
public class SayHello implements Task, ManagedLifecycle {
private SynapseEnvironment synapseEnvironment;
@Override
public void destroy() {
// TODO Auto-generated method stub
}
@Override
public void init(SynapseEnvironment arg0) {
this.synapseEnvironment = synapseEnvironment;
}
@Override
public void execute() {
try {
File file = new File("E:\\sayhello.txt");
// if file doesnt exists, then create it
if (!file.exists()) {
file.createNewFile();
}
FileWriter fw = new FileWriter(file.getAbsoluteFile(), true);
BufferedWriter bw = new BufferedWriter(fw);
bw.write("---------------- HELLO ----------------- "+ (new Date()).toString() + "\n");
bw.close();
} catch (IOException e) {
e.printStackTrace();
}
}
}
Step 2:
Export the above class as a Jar file. Say with the name SayHello.jar
Step 3:
Add the above class to the ESB Class path by placing it in the <ESB_HOME>/repository/components/lib directory.
Step 4:
Now you can create the Scheduled task in your ESB.
1. Login to the ESB
2. Select "Scheduled Tasks" under the "Main" tab
3. Add a new task
Replace the Task Implementation field with the qualified name of the class you created.
In the next section the Trigger type would be what type of scheduled task you want it to be. By simply defining the count and interval, or by providing a cron expression. Lets select "simple" for this example.
Count - defines how many times your job needs to run
Interval - specifies time gap between task executions
Click Schedule to save the task.
Aaaand That's it ...
Your output file would show the following:
---------------- HELLO ----------------- Mon Jun 09 20:11:37 IST 2014
---------------- HELLO ----------------- Mon Jun 09 20:11:42 IST 2014
---------------- HELLO ----------------- Mon Jun 09 20:12:46 IST 2014
---------------- HELLO ----------------- Mon Jun 09 20:12:51 IST 2014
---------------- HELLO ----------------- Mon Jun 09 20:12:56 IST 2014
---------------- HELLO ----------------- Mon Jun 09 20:13:01 IST 2014
For more options in creating scheduled tasks visit the following page:
Adding and Scheduling tasks in WSO2 ESB
Thanks, Nice post!
ReplyDelete